17 things to do after buying a new router
So you got yourself a brand new router - congrats! Most likely its an ASUS, TP-Link or maybe Netgear or Linksys. Or maybe it is actually a modem, possibly from your internet service provider. No matter what it is and how you got it, here is some useful advice on what you should do with it immediately after first boot.
1) Login to the admin interface
There are quite a few router owners who just plug it in, turn it on and never touch it again. Get familiar with your device and it's features, as a working internet connection is such a critical part of our lives today. There are also major security risks involved, which should be mitigated. So check the administrator login information from the user manual, or often the default credentials are printed on a label at the bottom of the device. Login, grab a cup of coffee and read on.
2) Set a very strong admin password
You do not want anyone else accessing the administrative features of your router, period. Set a long and complex password and do not use the manufacturer's default. If you happen to forget it, that is not such a big of a problem - you can always reset your router and start from scratch.
3) Check for firmware updates
First things first - check that you are running the latest firmware version. If not, then update it. Updates patch the device against known vulnerabilities and sometimes add new features. Manufacturers typically provide updates for a few years, but your mileage will vary.
4) Turn on the automatic updates
Once updated, make sure you don't miss the next one by enabling automatic updates. The router will install the update when available and then reboot itself.
5) Disable remote access and management
Many router vendors provide remote access and management features for your router, including mobile phone apps. These are of course practical in some cases, but basically leave a back door open. The safest bet is to disable all these features.
6) Change the access point name to your liking
The default AP name usually consists on something based on the router brand or your internet service provider. Change it to anything you like, but never include any personal information (name, apartment number, etc.). Be creative and invent something funny. It is however better that the name is not too appealing for anyone going by your house and seeing it on their phone. Absolutely do not copycat the names of popular public WiFi hotspots,
Lord of the Pings and Abraham Linksys are some of the funnier ones I've seen.
7) Use the same SSID and password for all bands
In many cases the router is pre-configured with different access point names (SSID) for the 2.4 GHz and 5 GHz bands. They often contain strings like "5G" or "2G" to identify them from each other. Nowadays it is best practice to use identical names and passwords for both bands.
This enables the client device to choose which band it connects. The lower frequency 2.4 GHz signal travels farther and penetrates walls better, so this may help to get improved network coverage behind the corners that are farthest away from your router.
Any device manufactured during the last decade or so should be able to deal with identical SSID's for multiple bands and make just roaming decisions. If some device runs into network problems, you can always separate them later on.
8) Set a strong WiFi password – share it only with your family
Again, long and reasonably complex password for security reasons. Your devices will remember it, so you only need to type it once.
9) Setup a guest network
Friends and relatives come and go at your place and may want to make use of your network. Never share your primary credentials with them. Instead define a separate access point for guests, with a different name and password.
A guest network is isolated from your actual local area network, so that guests are unable to connect to your devices. Also, if someone leaks your password carelessly or by accident (kids can do this), you only need to set a new password for the guest network, and not reconfigure all of your own devices.
If you want look nerdy cool, print your guest network credentials as a QR code, and place it on the wall. Qifi.org can do this for you. Friends can now join your network by scanning the code with their phone's camera.
10) Use a public DNS resolver
Global public DNS resolver, such as Cloudflare, Quad9, Google or OpenDNS, tends to be more robust than local operator services. Using one also improves your privacy and security.
Cloudflare and Quad9 also block connection attempts to malicious and potentially dangerous websites, which adds an another layer of security. Optionally, Cloudflare can also filter out inappropriate/adult content, if family safety is a concern.
Some routers also support encrypted DNS requests, which further improves your privacy and security, as it makes it harder for anyone to monitor what sites you are browsing. Worth enabling, if available.
11) Disable WPS and UPnP
The WiFi Protected Setup and Universal Plug and Play are usability features that intend to make it easier to connect to your router or or open network ports for certain services. If you don't know what these mean, you most likely don't need them and they should be disabled for improved security.
If you are an expert and know what ports you need to open and forward on your firewall, you can do it manually.
12) Install a WiFi-analyzer app on your phone
Especially in urban areas it is worth while to have look at the local wireless signal environment, and see if there are noisy neighbors causing interference with your signal. WifiMan by Ubiquiti is my favorite. The app also shows all the devices connected to your network, allows you to test the signal strength around your house, perform speed tests and much more.
13) Consider setting the 2.4 GHz band to 20 MHz bandwidth and check the channel
As said, the 2.4 GHz signal travels far and penetrates walls well. Especially in a city environment, the 2.4 GHz bands can be very crowded. If that is the case, it is best to limit the channel width to 20 MHz to minimize interference. All routers have an automatic channel selection feature, but if you router seems to make a bad choice, which they often do, choose manually channel 1,6 or 11, which ever appears least crowded. Run some speed tests to check which channel works best.
In rural areas none of the above really matter as radio signal conditions are good.
14) Also check the 5 GHz band for noisy neighbors and adjust accordingly
The high frequency bands do not penetrate walls as well, so interference from neighbors is less significant, but not zero. If you live in a flat, your next door neighbor just might also be on channel 44 and his router on a desk only one meter away. In this scenario, pick a different channel than the nearest access points of others.
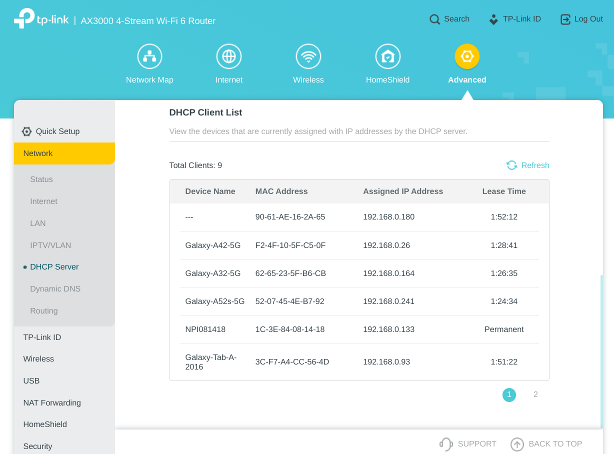
15) If you have a WiFi-enabled printer, reserve the IP-address
The router gives each connecting device a unique IP-address. This may however change, if the device disconnects and then again reconnects. If you have a network printer in place, you want fix the IP-address to be always the same, so that you don't need to adjust your printing settings after every printer reboot. Most routers have an IP-address reservation feature for this purpose.
16) Make a note of your settings for easier disaster recovery
Routers are electronics and electronics can break. If you suddenly need to replace your router, you'll do it faster if you remember your configuration. And one day you need to replace it anyway, as routers have a limited support period and stop receiving critical updates after a few years.
Access point name and password is the bare minimum. If your router fails, you can replace it in seconds by using your mobile phone's hotspot feature with identical credentials. Your computer, TV, tablet and other devices will automatically connect to your phone and get back online.
Reserved IP-addresses of printers and other devices is very useful information in case you need to replace your router. Just do the same reservations on the new one, and avoid a lot of reconfiguration effort.
17) If possible, place your router to a central location
With the configurations done and settings saved, you can now give final thought to the router placement.
There router should be near the area where most of the network usage happens, and a central location provides the best signal coverage around your house. This is not always possible. For example cellular 4G/5G modems should be placed by a window to the direction of your closest cell tower.
Avoid placing the router to an outer corner of your house. The majority of the signal would be transmitted outside of your walls, and the distance to the opposite corner is maximized, reducing signal strength. However, if your place is small, then this makes no difference, as the WiFi signal will cover your home anyway.
The materials of the walls and structures also make a difference. Concrete and steel block radio signals quite efficiently. A centrally positioned modern WiFi-router can typically cover about 2000 square feet or 180 m² of living space. My apartment is roughly 100 m² and the building is made of steel enforced concrete. A TP-Link AX55 can just barely push the signal from corner to corner. When positioned closer to the center, it covers the whole place easily.
Final thoughts
Quite a lot of steps, huh, but in reality it takes only an hour or two to get things done right, depending on how much you need to learn the basics. I tried to make this article as comprehensive as possible, as there are many similar guides around the internet, but they all seem to miss a point or two. The exacts steps to apply these settings are different for each router brand. In many cases the manufacturers websites provide good documentation on how to get these done. Google them up.
I hope you found this guide useful and learned something. If not, then you already know what you are doing.